How to make French Baguette
This baguette recipe is a simple way to learn how to make baguette at home with a crisp crust and soft, airy interior. A classic French baguette recipe that shows how approachable homemade French bread can be, even if you’re just starting out.

The kind of Baguette you make more than once
French Baguette is one of those recipes that feels more complicated than it actually is. This baguette recipe is how I approach it in my kitchen—simple, focused, and built around understanding the dough rather than following strict rules.
When you start learning how to make baguette, you realize it’s less about perfection and more about feel. The dough changes depending on the environment, and over time you get used to how it should look and behave. If you’ve tried my no-knead bread before, you’ll notice a similar idea here—letting time and technique do the work instead of forcing it.
For me, it comes down to a few key moments—the shaping, the final rise, and the bake. You’re looking for that golden crust and a light, airy interior. It’s a straightforward French bread recipe homemade, but one that teaches you a lot the more often you make it.
Why you’ll love this French Baguette Recipe
It’s simpler than it looks
Once you understand the basics, this baguette recipe becomes very approachable. It’s more about timing and feel than complicated steps.
It teaches you real bread technique
From shaping to baking, you start to understand how dough behaves. It’s a hands-on way to learn how to make baguette properly.
It gives you that classic result
A crisp crust, a light interior, and that unmistakable French bread texture—this is the kind of homemade baguette you’ll want to make again.
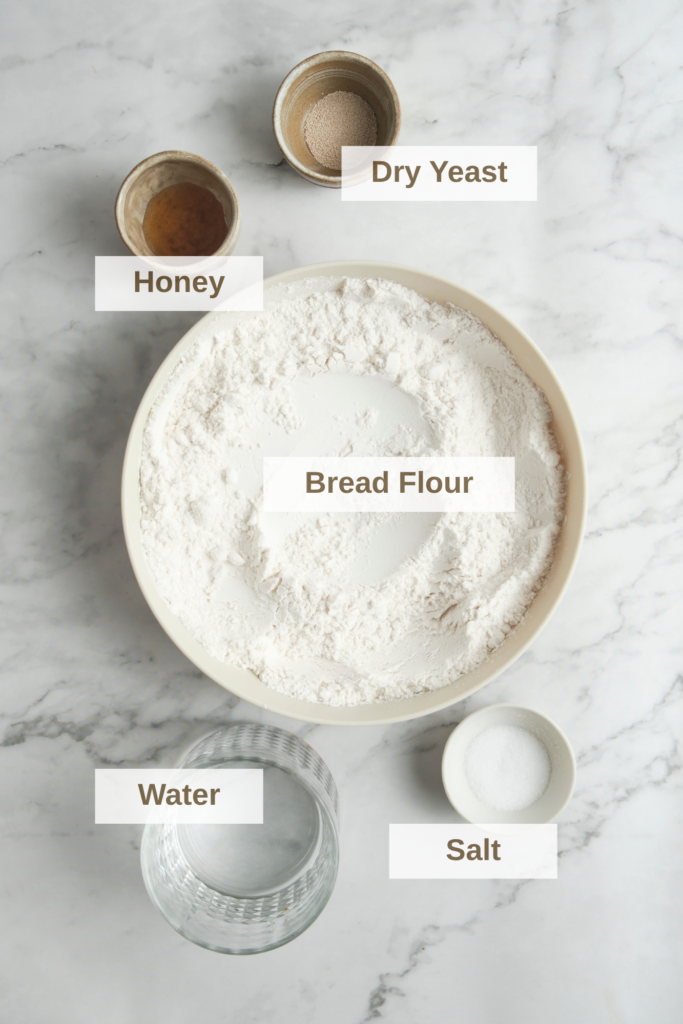
Key Ingredients for French Baguette
Bread flour
This is the foundation of your baguette. Bread flour has a higher protein content than regular flour, which helps develop strong gluten. That’s what gives the dough structure and creates that chewy, airy interior typical of a good French baguette.
Water
Water brings the dough together and hydrates the flour. It activates gluten development and determines the texture of the dough. The right balance here is key—a slightly sticky dough leads to a lighter, more open crumb.
Active dry yeast
Yeast is what makes the dough rise. It ferments the sugars in the dough, creating gas that gives the baguette its airy structure. Proper activation and timing are important for both texture and flavor.
Salt
Salt controls fermentation and strengthens the gluten structure. It also enhances the overall flavor of the bread, giving it depth and balance. Without it, the baguette would taste flat.
Honey
A small amount of honey feeds the yeast and helps kickstart fermentation. It also adds a subtle sweetness and supports browning in the crust, giving the baguette that deeper golden color.
Step-by-step: from dough to baked baguette
This is the full process, but kept simple. Each step builds on the last—once you understand what to look for, it becomes much more intuitive.
1. Mixing & building structure (dough & technique)
2. Cold rest (fermentation & timing)
3. Preparing the oven & steam setup
4. Shaping the baguettes (structure)
5. Final proof (fermentation)
6. Scoring (control the rise)
8. Baking to finish
Dough & Technique
This is the part that really defines your baguette. Ingredients matter, of course—but how you handle the dough is what makes the difference between something average and something you actually want to bake again.
Understanding the Dough
At the beginning, the dough will feel rough and a bit sticky—that’s normal. As it rests and develops, it becomes smoother, more elastic, and easier to handle. I always pay attention to how it changes rather than just following time. By the end of the first rise, it should feel soft, slightly airy, and hold its shape without collapsing.
Why Hydration matters
Water controls the texture of your bread more than anything else. A slightly higher hydration gives you that open, airy crumb you expect from a good baguette, but it also makes the dough a bit more challenging to handle. That’s part of the process—you learn to work with it rather than fight it. Too little water, and the bread turns dense. Too much, and it loses structure.
The Importance of Gluten Development
Gluten is what gives the dough strength. It’s what allows it to stretch, hold gas, and create that light interior. You build it through mixing, resting, and gentle handling—not by overworking the dough. Once it’s properly developed, you’ll feel it: the dough becomes elastic, slightly bouncy, and much easier to shape. That’s when you know you’re on the right track.
Fermentation & timing
This is where most of the flavor and texture develop, so it’s worth paying attention.
How to know when your dough is properly proofed
The dough should feel light, slightly airy, and hold a gentle indentation when you press it. If it springs back too quickly, it needs more time. If it collapses, it’s gone too far.
Bulk fermentation vs final rise
The first rise (bulk fermentation) builds structure and flavor. The final rise happens after shaping and is about giving the dough its final volume before baking.
How temperature affects your dough
Warmer temperatures speed everything up, colder ones slow it down. I always adjust timing based on how the dough behaves, not just the clock.
Shaping & structure
This is where the baguette really takes its final form. Shaping isn’t just about looks—it directly affects how the bread rises and how the crumb develops.
How to shape a baguette properly
After the first rise, gently turn the dough onto your work surface without knocking out too much air. Lightly flatten it, fold it in stages, sealing each fold, then roll it into a log from the center outward. Keep the pressure even to create a uniform shape without tearing the dough—this is where your step-by-step photos really help.
Creating surface tension (and why it matters)
As you shape, you’re gently tightening the outer layer. This surface tension helps the baguette hold its shape and rise properly in the oven. You’ll feel it when it’s right—the dough becomes smooth and slightly tight.
Common shaping mistakes to avoid
Avoid pressing too hard or overworking the dough, as this removes air and makes it dense. Not sealing the folds properly or rolling unevenly can also affect the final shape. Keep it gentle and controlled.
Baking process
This is where everything comes together. A good bake is what gives you that classic baguette texture—crisp on the outside, light on the inside.
Why steam is important for baguette
Steam in the oven keeps the surface of the dough soft in the first minutes of baking. This allows the baguette to expand properly before the crust sets. Without steam, the crust forms too early and limits that final rise.
How to get a crispy crust at home
Preheat your oven well and create steam at the start—this can be as simple as placing a tray of hot water in the oven or adding water to a hot pan. Once the steam phase is over, let the moisture escape so the crust can dry out and become crisp.
How to score baguette (and why it matters)
Scoring controls how the bread opens in the oven. Make a few shallow cuts along the surface with a sharp blade just before baking. This guides the expansion and prevents the crust from cracking randomly.
1. Mixing & building structure (dough & technique)
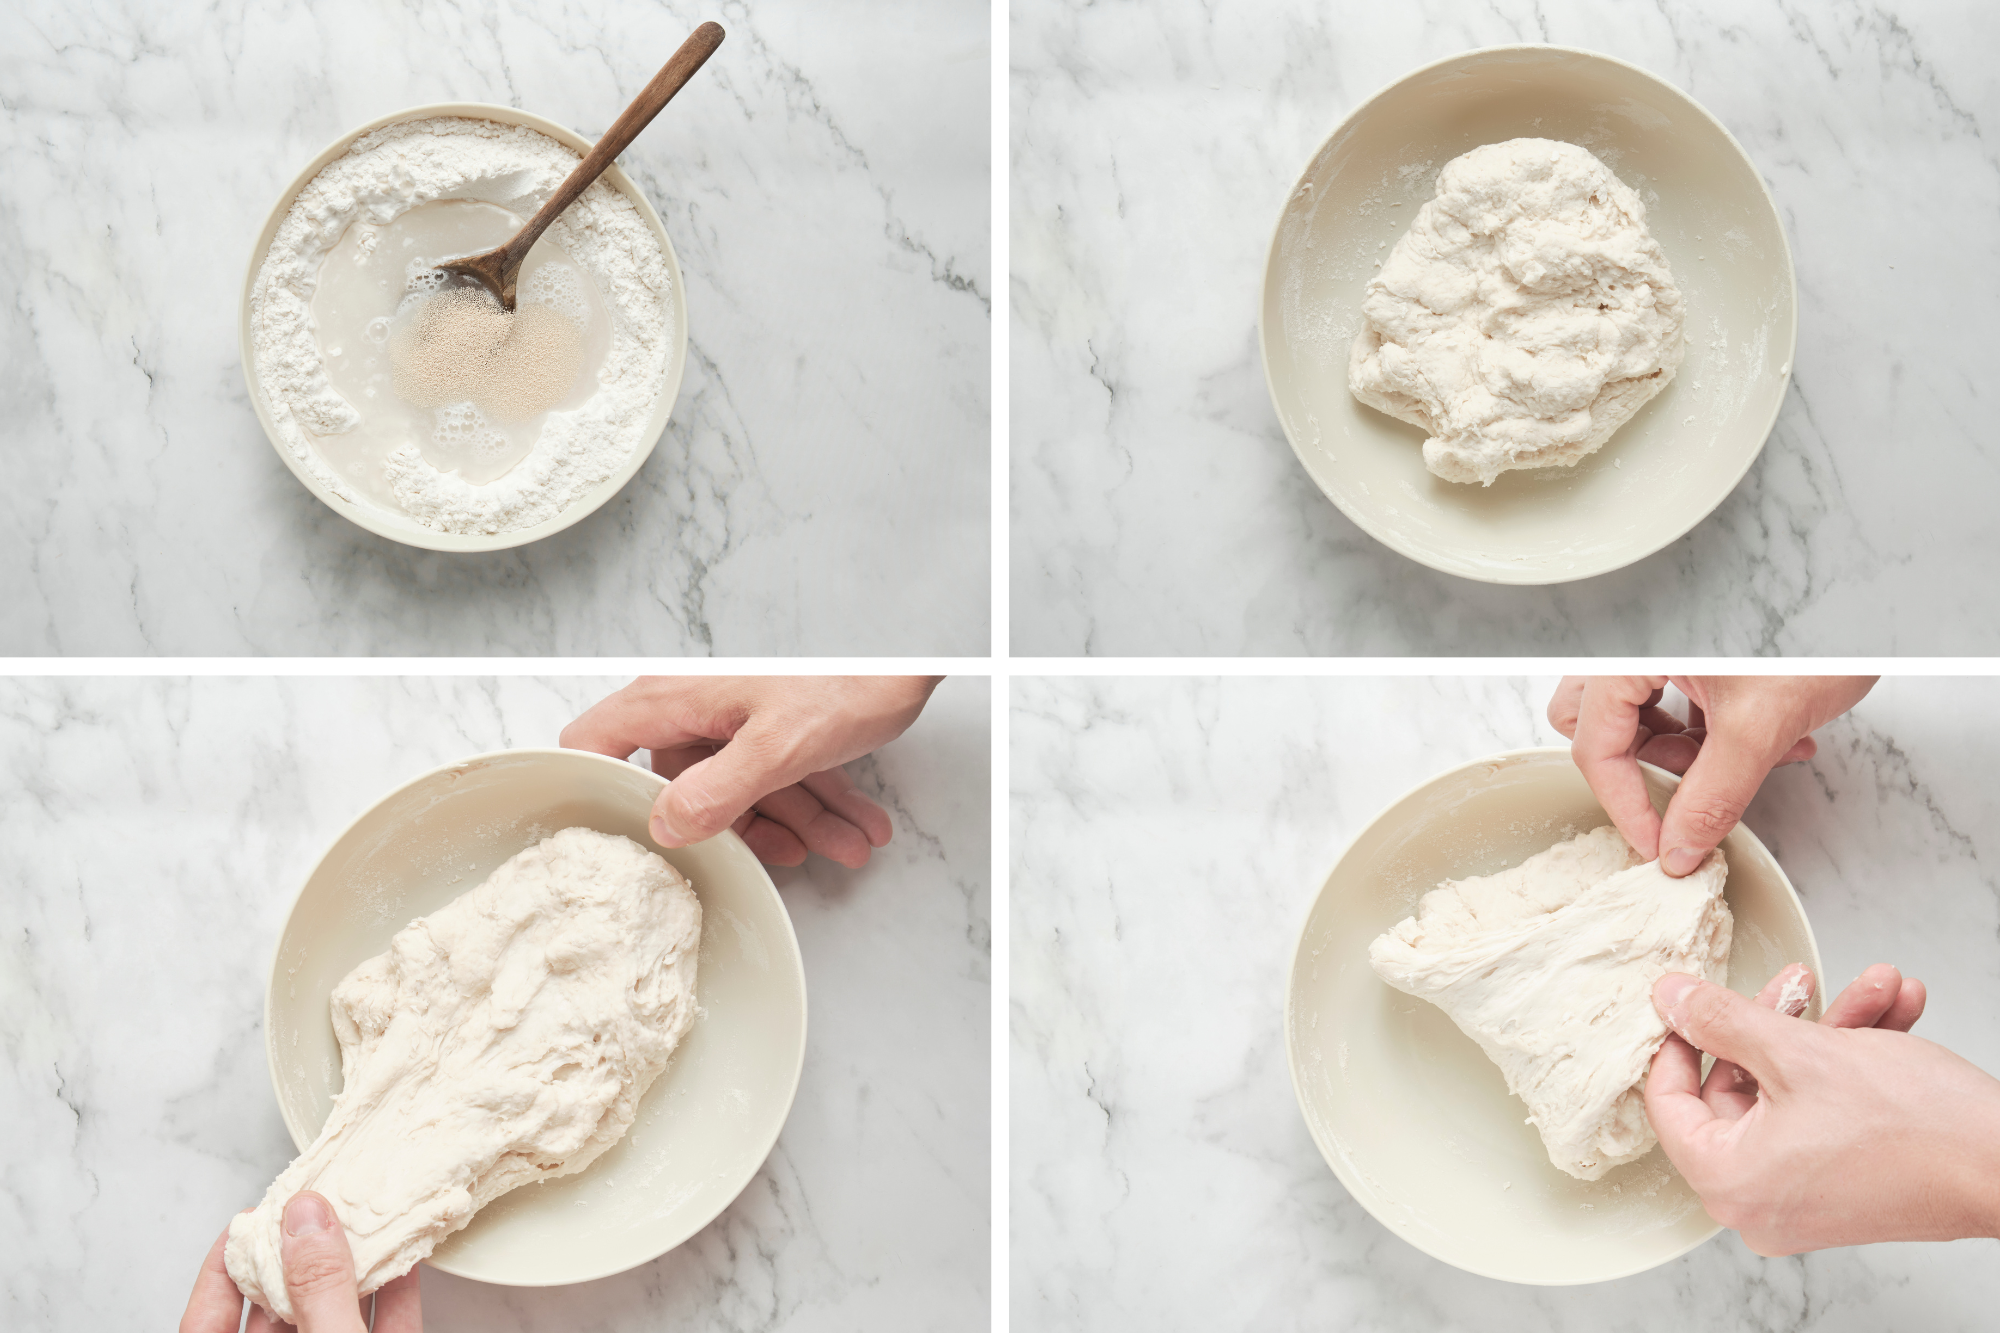
Start by mixing the flour, water, yeast, salt, and honey until you get a rough, slightly sticky dough. Don’t expect it to be smooth at this stage. Let it rest for a few minutes, then begin your stretch and folds. Every 30 minutes, gently stretch one side of the dough and fold it over itself, repeating from all sides. This develops gluten slowly and gives the dough strength without heavy kneading. Over time, you’ll feel it change—becoming smoother, more elastic, and easier to handle.
2. Cold rest (fermentation & timing)
Once the dough has some structure, transfer it to the fridge for a cold fermentation. This slows everything down and allows the dough to develop deeper flavor. It also makes shaping easier later. By the end of this stage, the dough should feel slightly airy and relaxed, not dense.
3. Preparing the oven & steam setup
Preheat your oven thoroughly—this is essential for a good rise. Place a tray or pan inside the oven that you can use to create steam. That initial burst of heat and moisture is what helps the baguette expand before the crust sets.
4. Shaping the baguettes (structure)
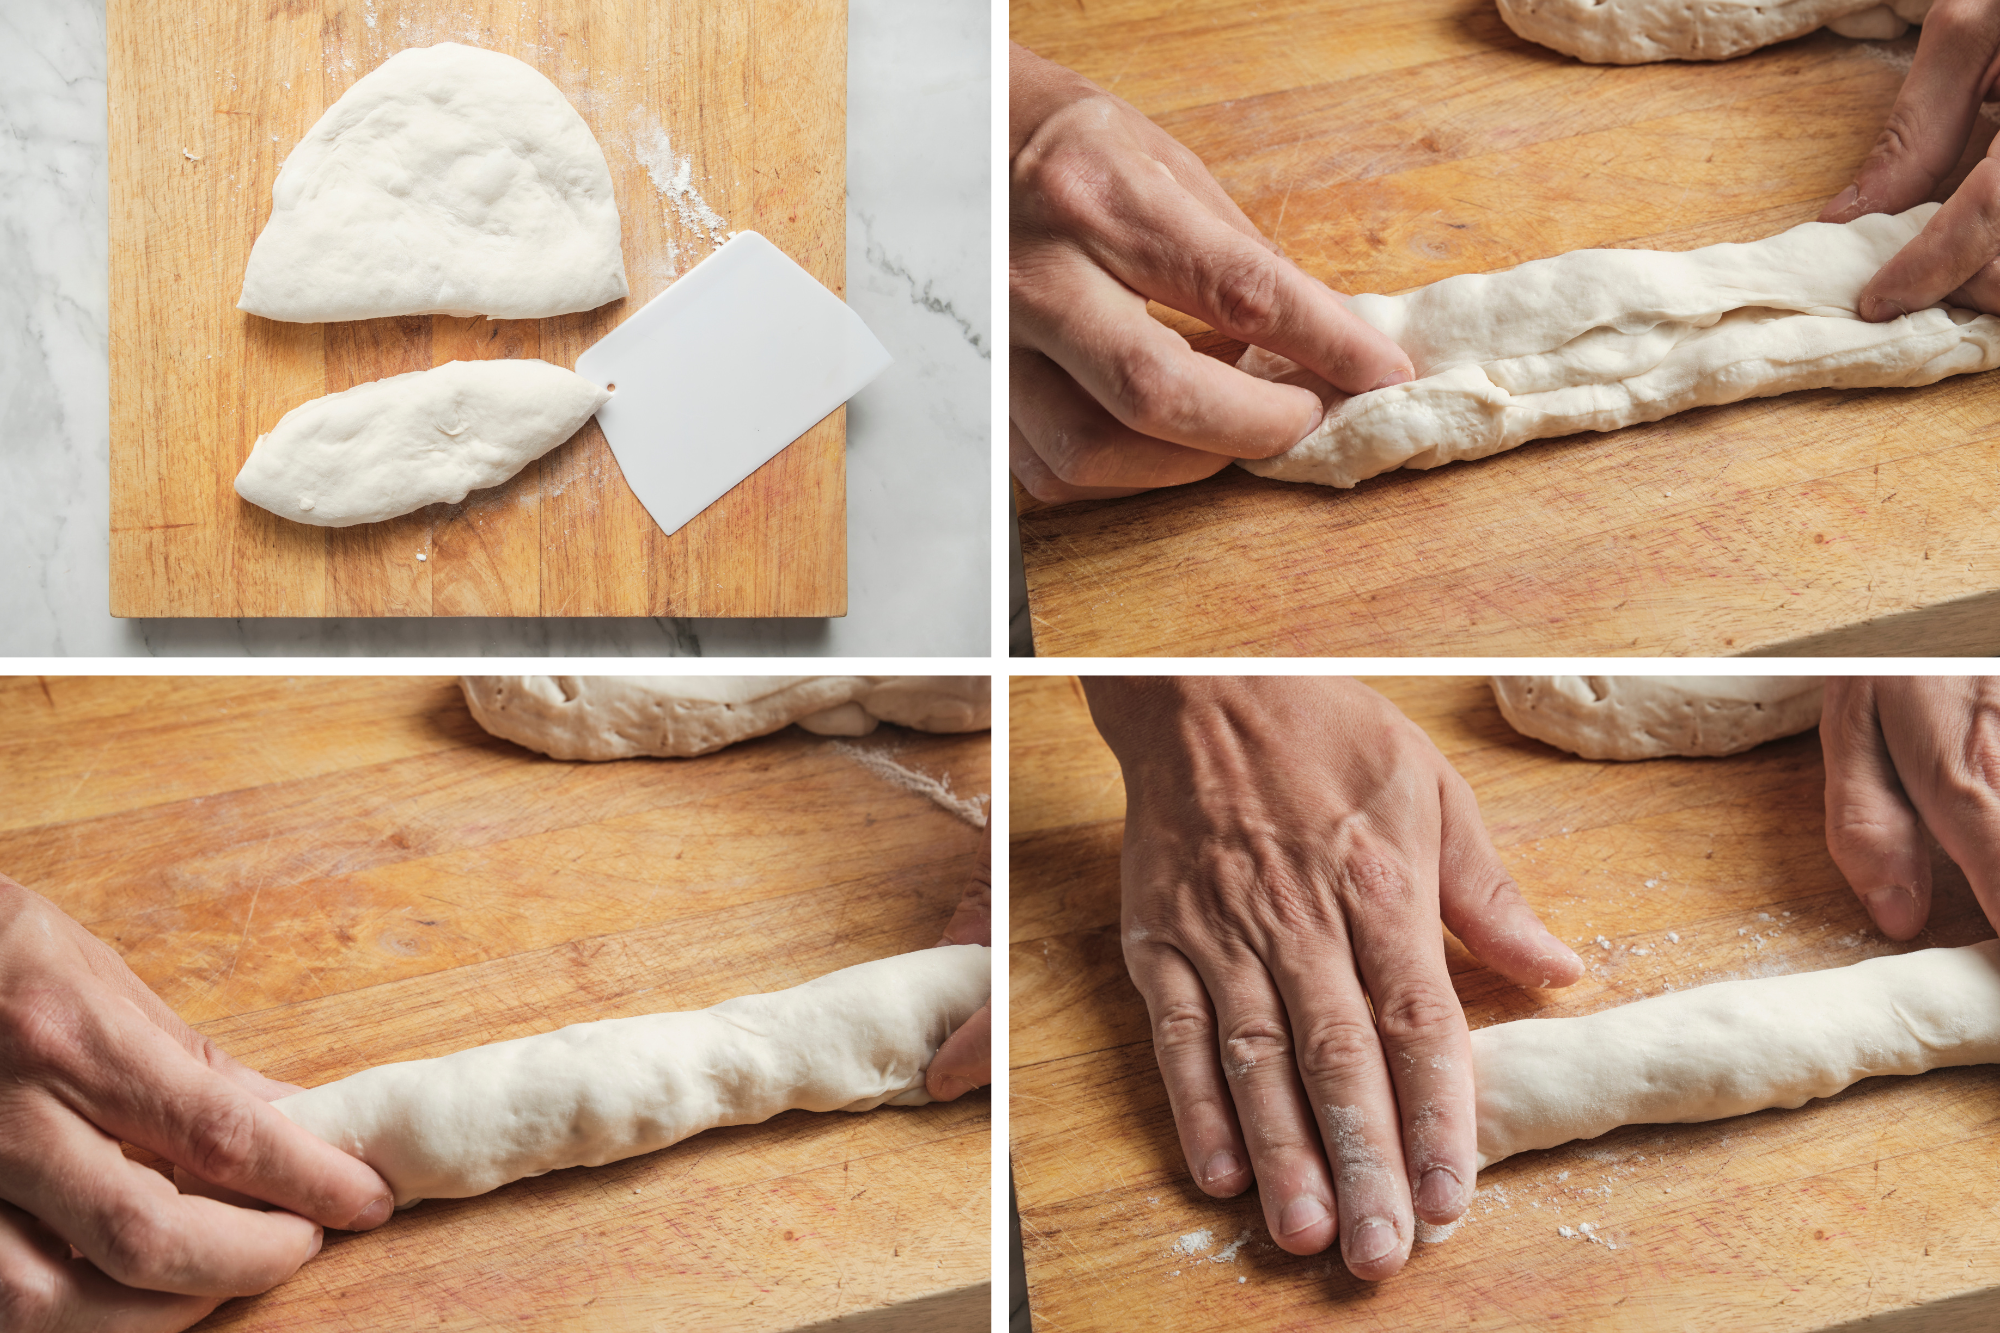
Turn the dough out onto a lightly floured surface and divide it into three equal pieces. Gently shape each piece into a rough rectangle and let them rest for 45–60 minutes. This resting time helps the dough relax, making it easier to shape without tearing.
Once rested, take one piece and stretch it slightly into a longer rectangle. Starting from the long side, fold the dough inward and press lightly to seal the seam with your thumb. Repeat this folding process two more times, creating a tight cylinder while being careful not to push out too much air. Finally, seal the seam with the palm of your hand and gently roll the dough from the center outward to reach your desired baguette length.
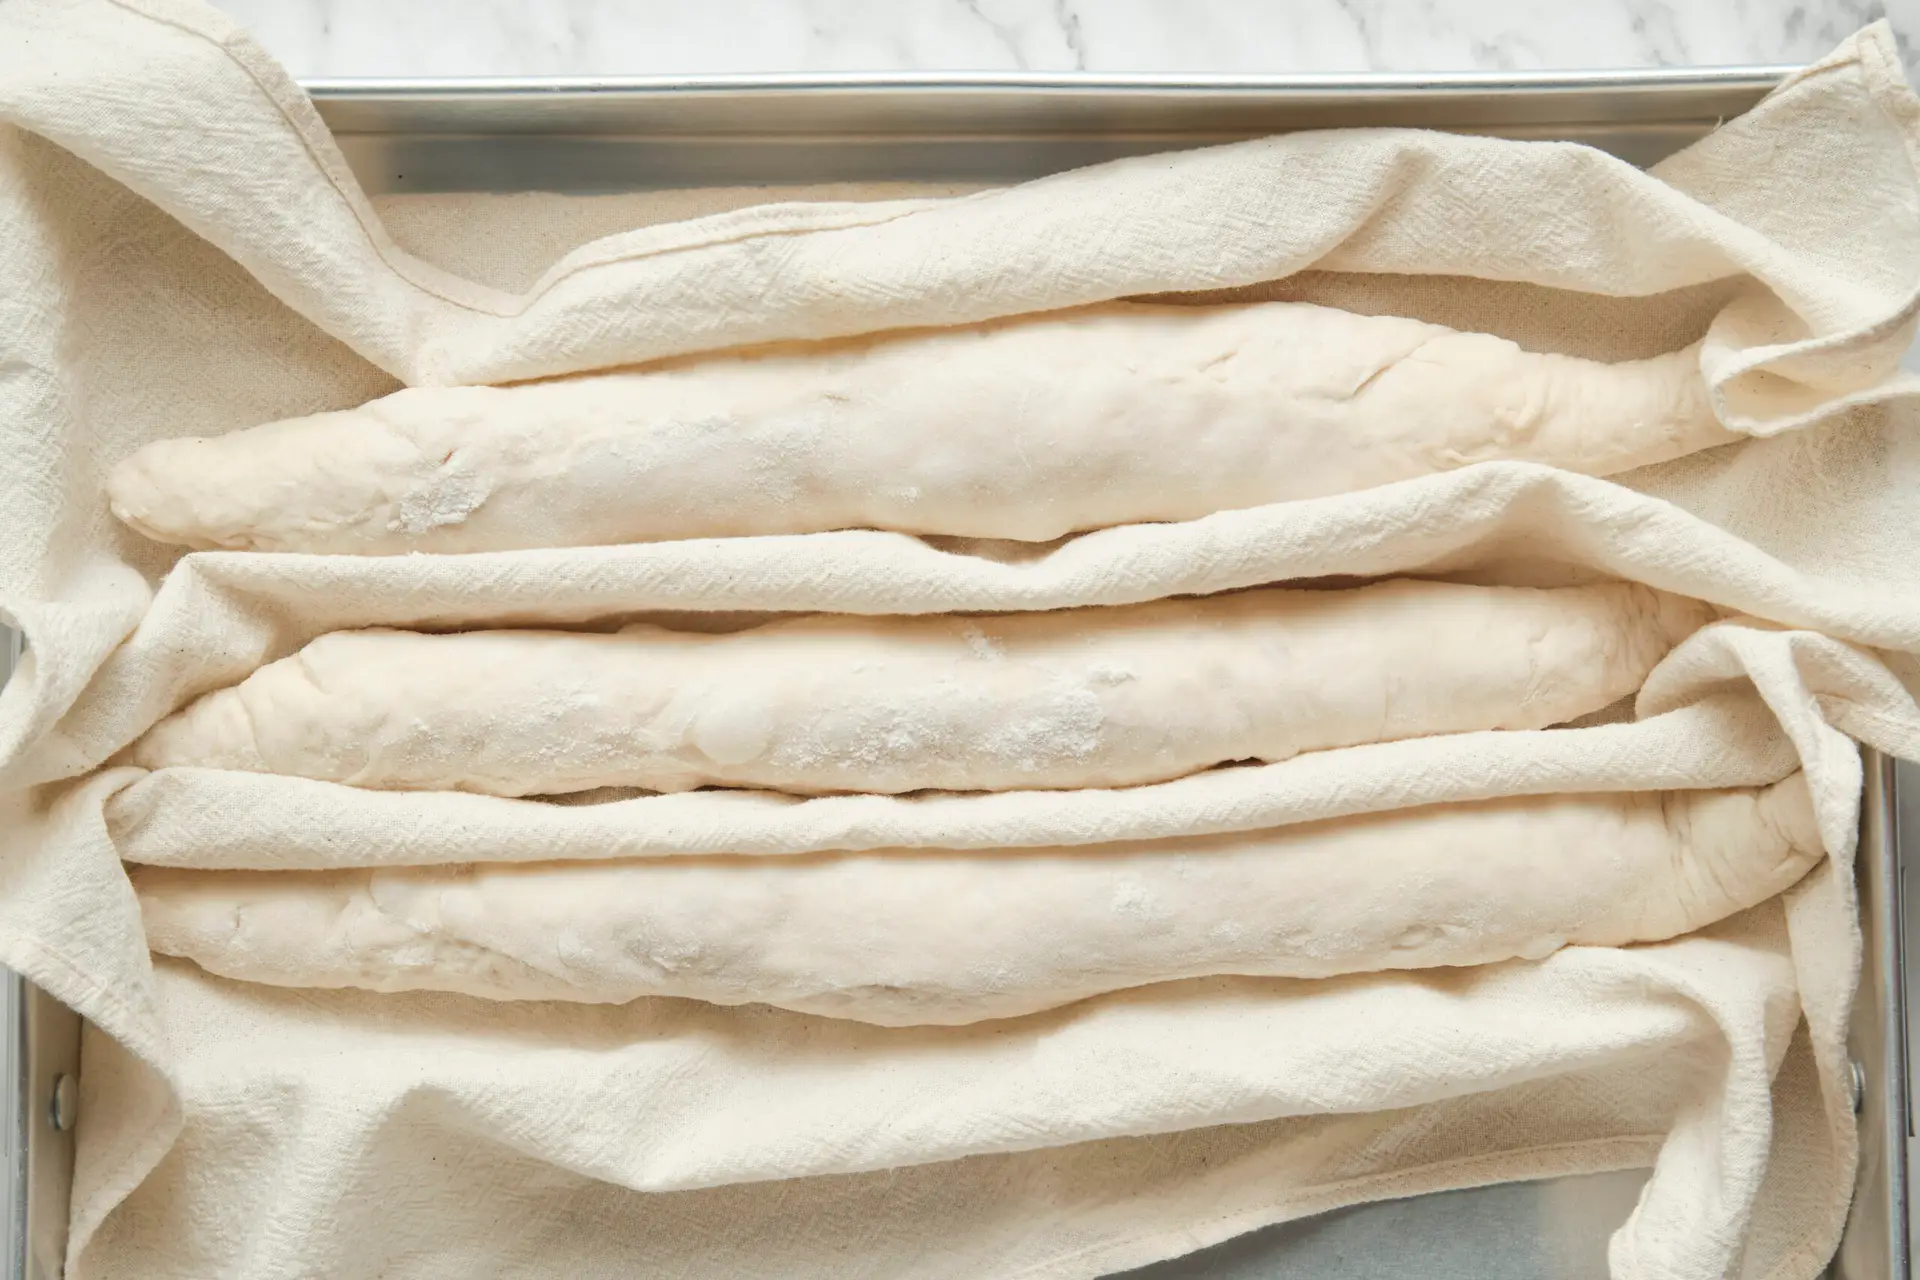
5. Final proof (fermentation)
Place the shaped baguettes on a floured cloth or tray and let them rise again. This final proof gives the dough its lightness. They should look slightly puffed and feel airy. If you press gently, the dough should slowly spring back—this is a good sign they’re ready.
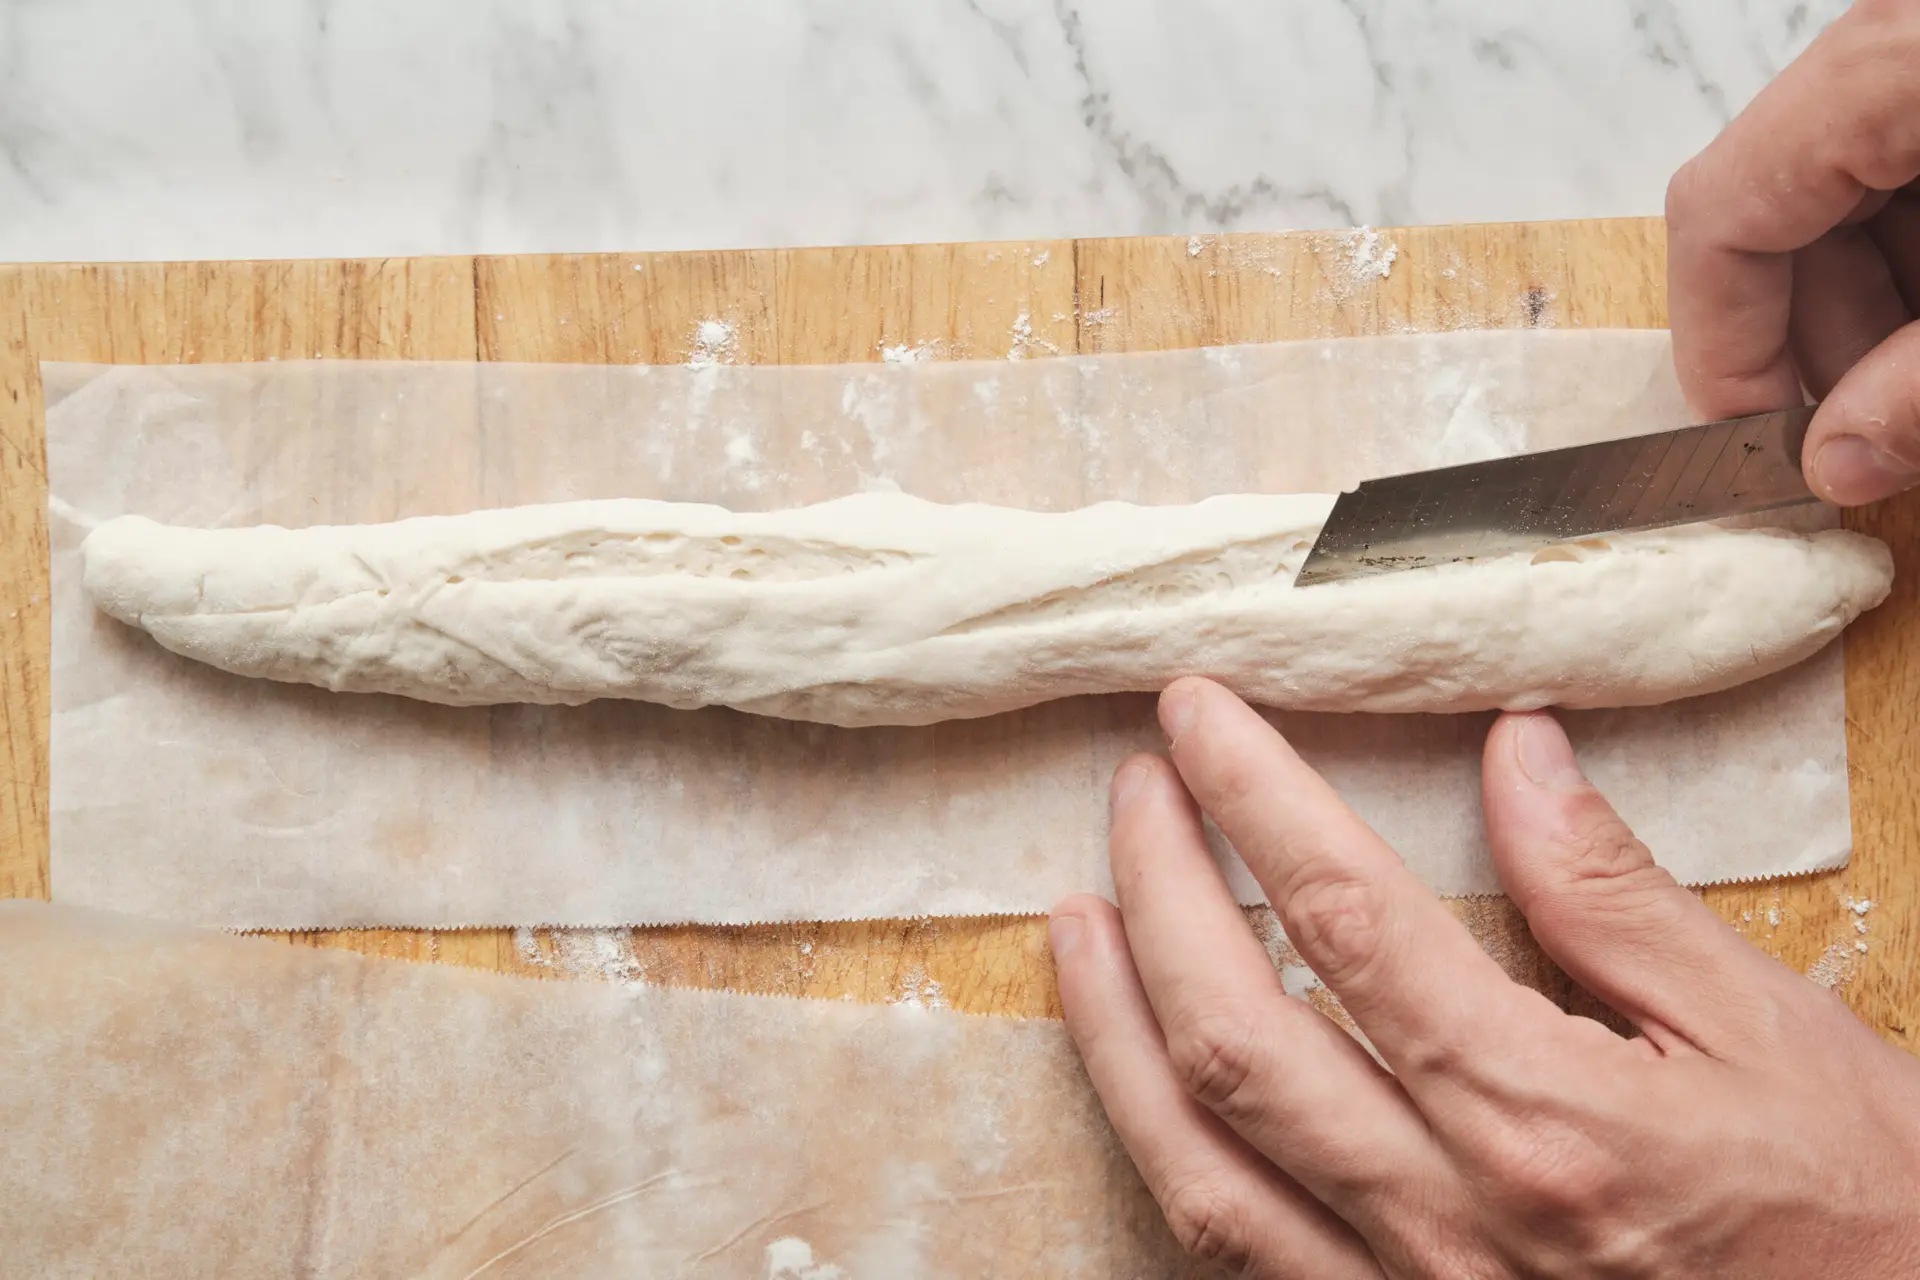
6. Scoring (control the rise)
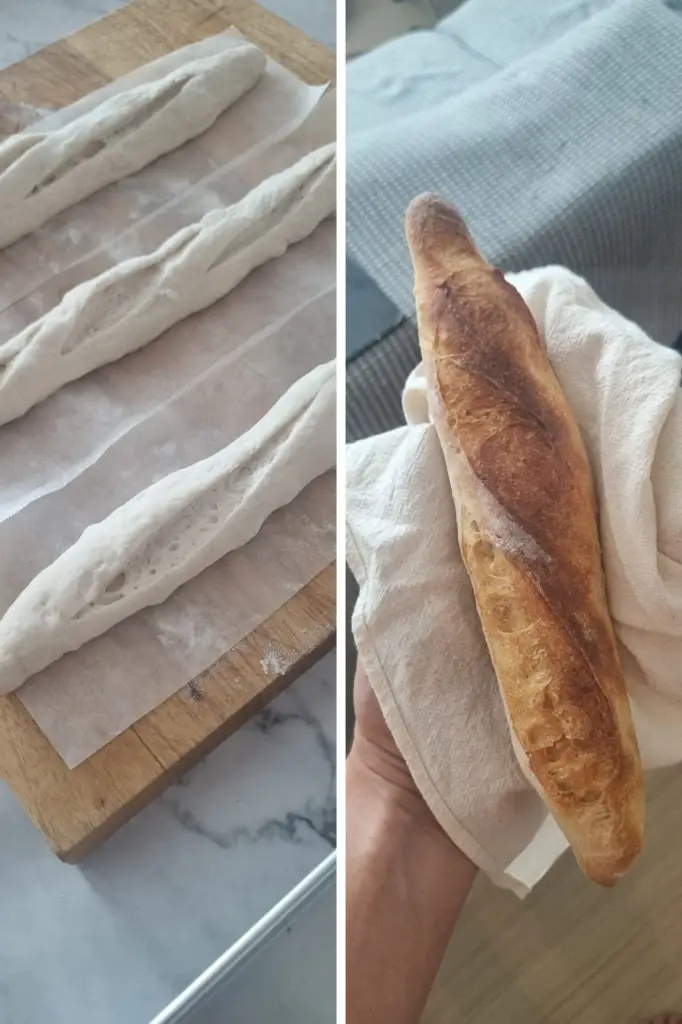
Just before baking, score the surface with a sharp blade. Make a few shallow cuts along the length of each baguette. This step controls how the bread expands in the oven and helps create that classic look. Without scoring, the crust can tear unpredictably.
7. Into the oven with steam
Transfer the baguettes into the hot oven and immediately create steam by adding water to your preheated tray. The steam keeps the surface soft during the first minutes of baking, allowing for proper oven spring and a better crust.
8. Baking to finish
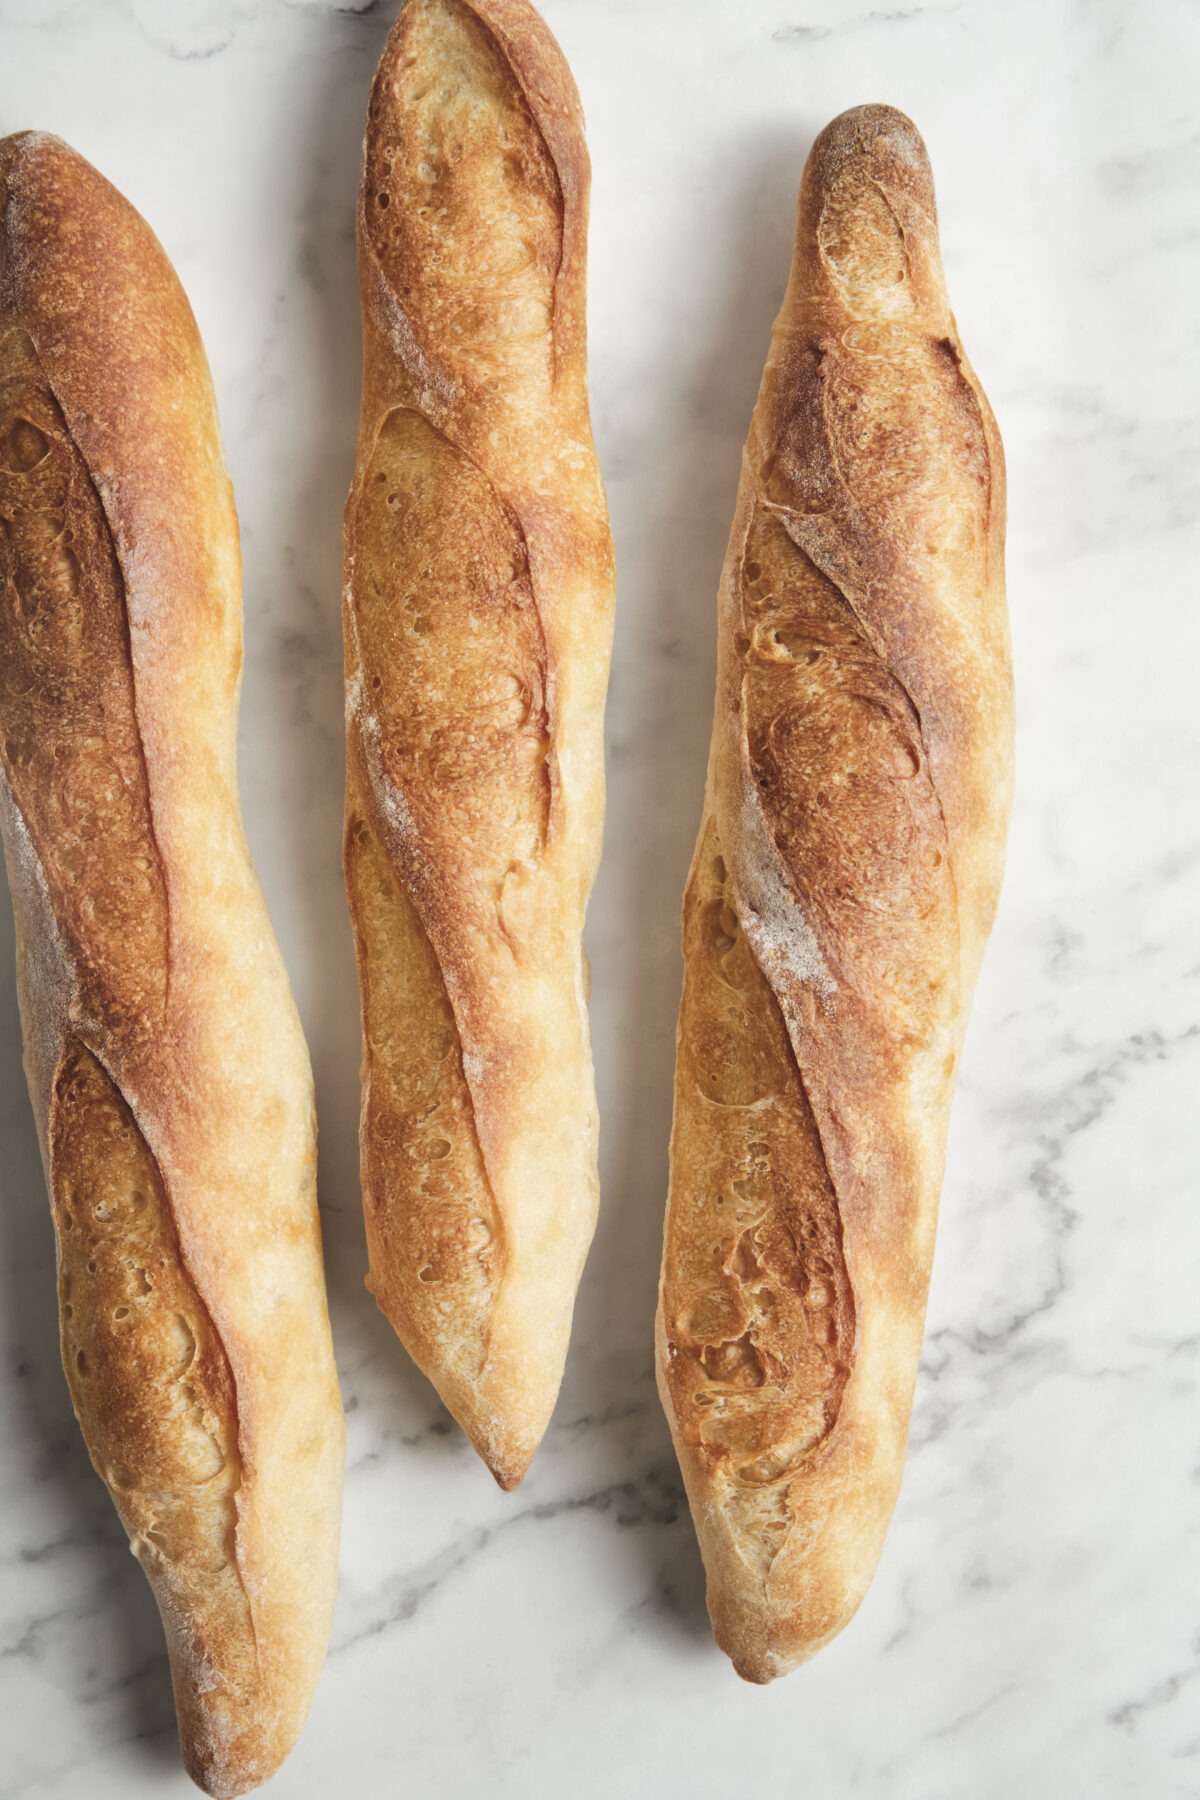
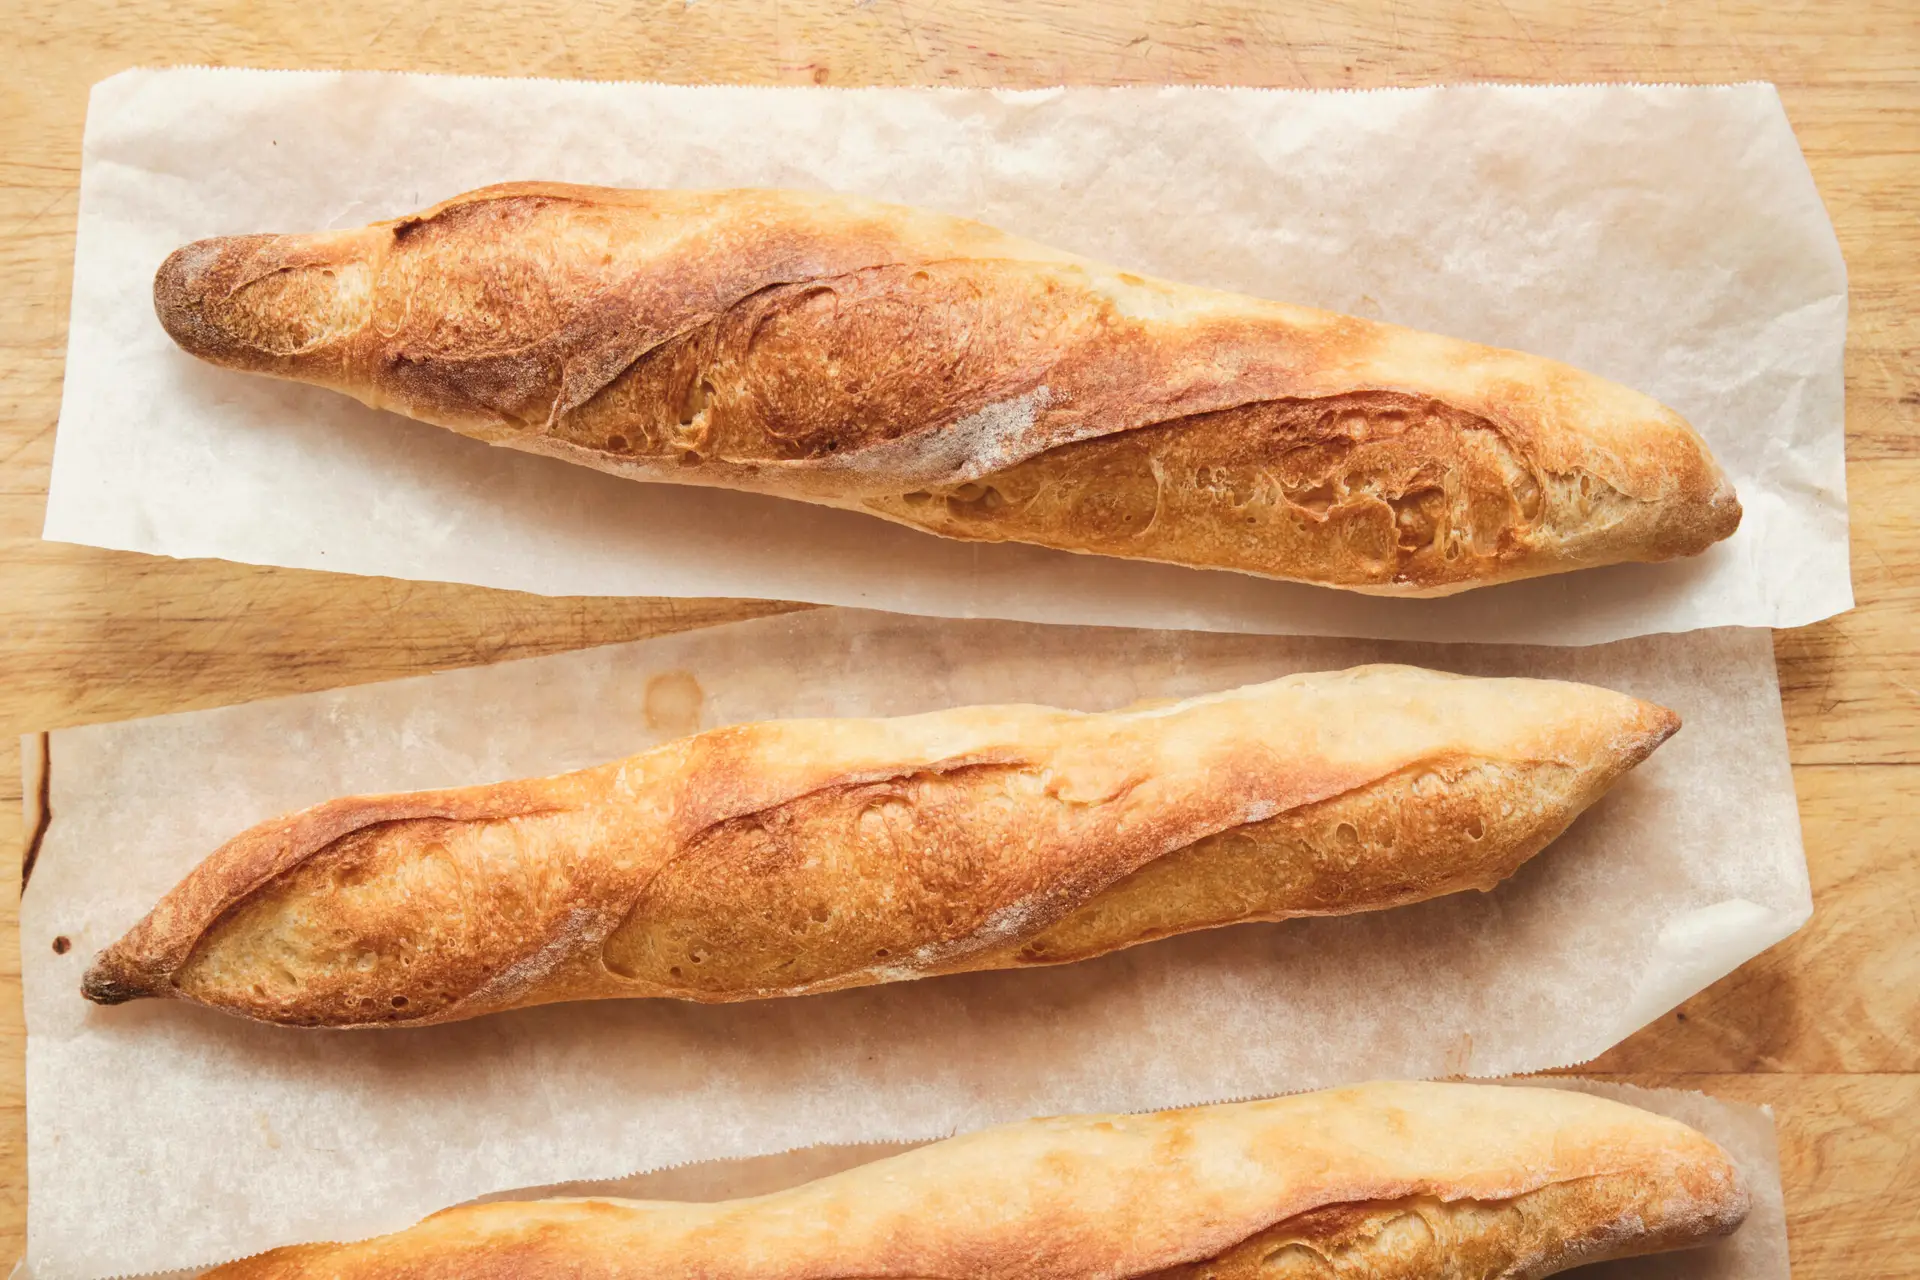
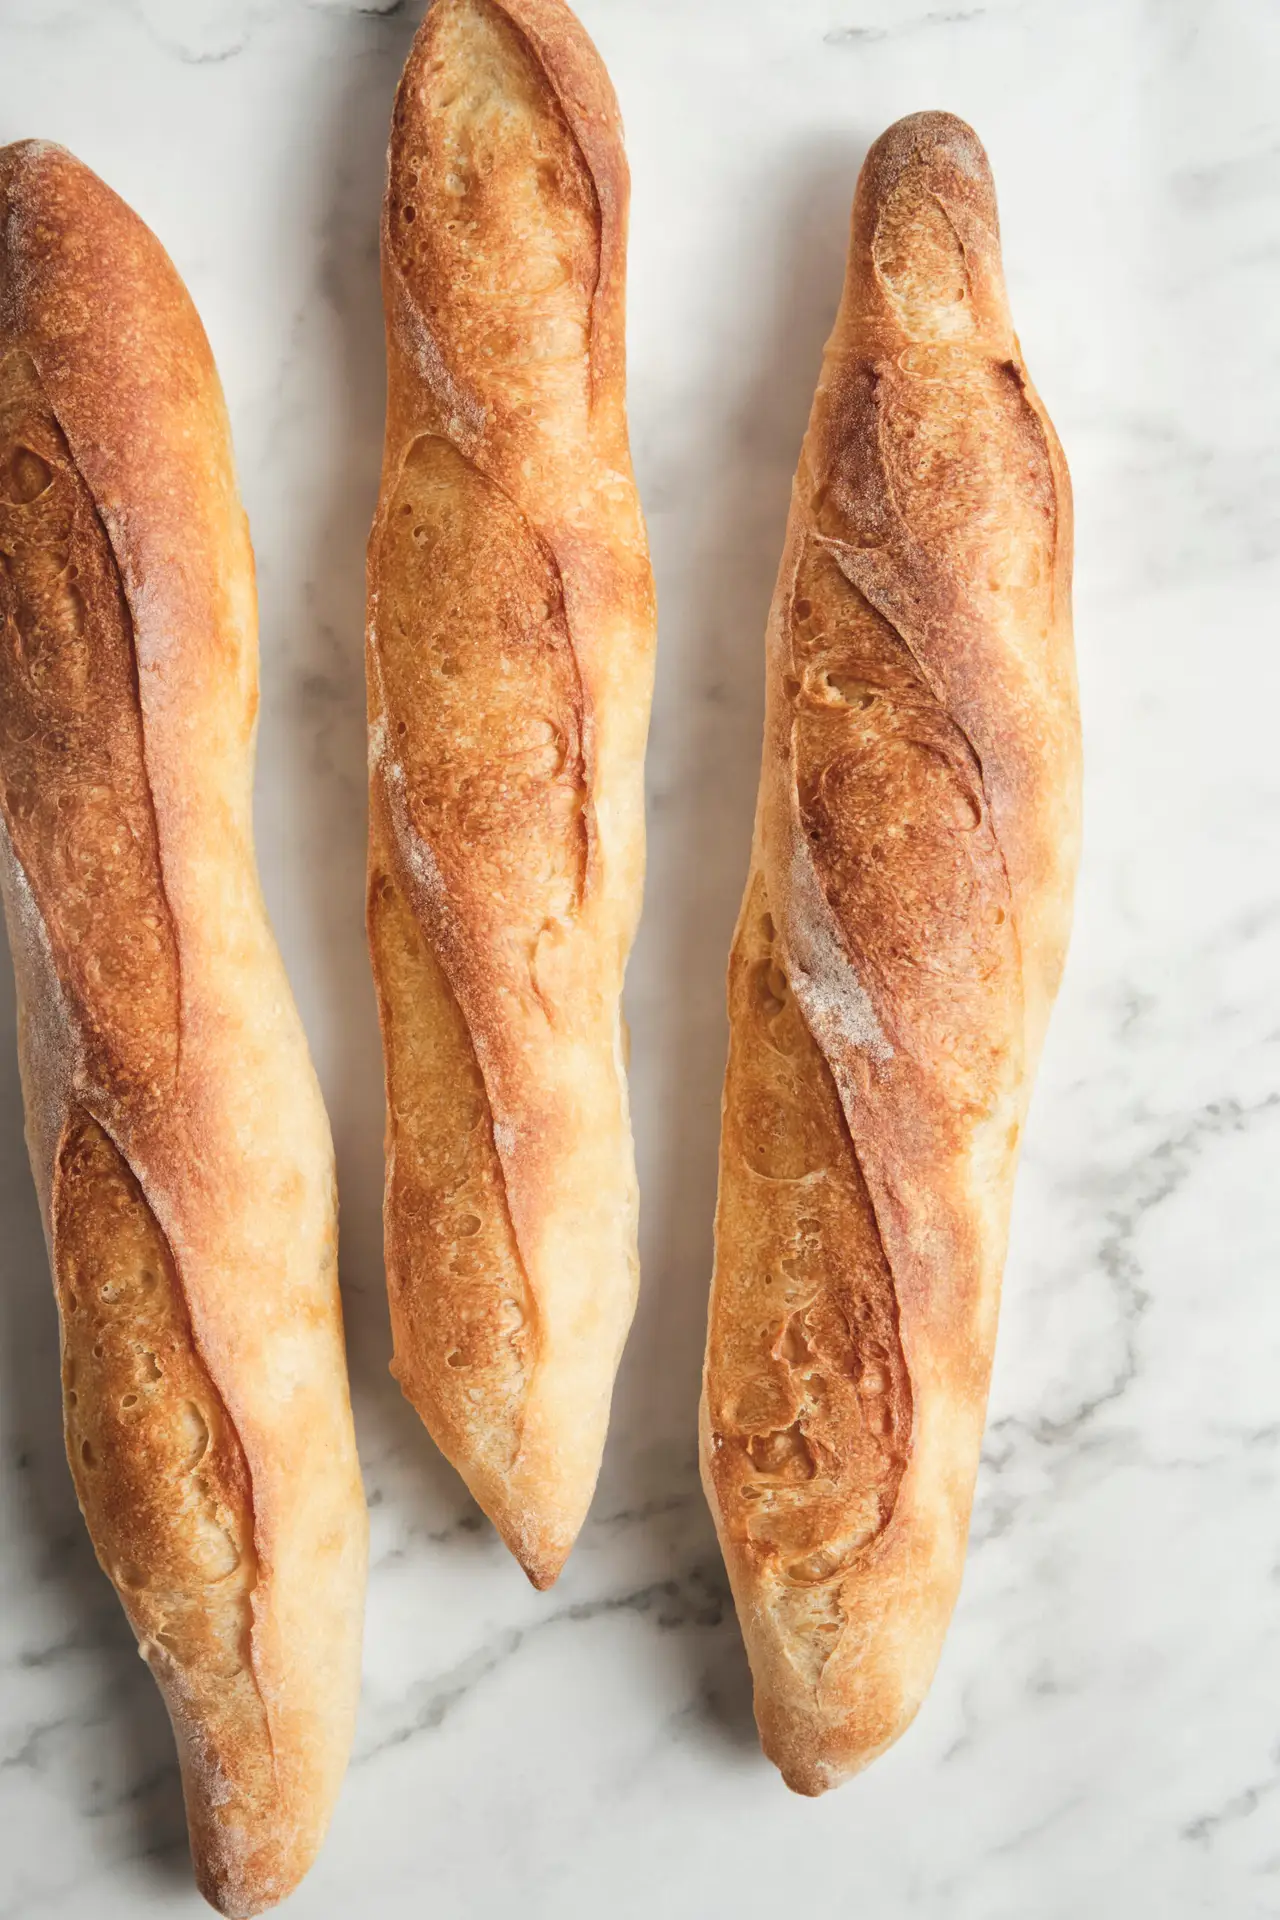
Bake until the baguettes are deep golden brown with a crisp crust. They should feel firm and sound slightly hollow when tapped on the bottom. Let them cool before slicing—this allows the crumb to set and keeps the texture light and open.
This baguette recipe is one of those bakes that really teaches you to slow down and pay attention. Once you go through the full process—from mixing and fermentation to shaping and baking—you start to understand how dough behaves, not just how to follow steps. That’s really the heart of how to make baguette at home.
What I like most about this French baguette recipe is how it builds your intuition over time. The more you make it, the more natural it feels. You stop overthinking and start reading the dough—how it rises, how it stretches, how it responds at each stage.
In the end, this is more than just a French bread recipe homemade. It’s a simple, hands-on way to connect with baking. And once you’ve made it a few times, this baguette recipe becomes something you can rely on—something that just feels right every time you pull it from the oven.
FAQ
This usually comes down to fermentation. Either the dough didn’t proof long enough, or the yeast wasn’t active. Temperature also plays a big role—too cold slows everything down, too warm can overproof the dough.
Steam is key. The dough needs moisture in the first stage of baking so it can expand properly. After that, a dry, hot oven helps develop that crisp, golden crust.
Yes, and in fact cold fermentation improves flavor. Letting the dough rest overnight in the fridge often gives you better texture and a more complex taste.

Behind the scenes
Fresh from the oven, the baguettes come out deep golden with a crisp, crackling crust and that unmistakable smell of freshly baked bread filling the kitchen. I always let them rest for a few minutes before cutting, but it’s hard not to take that first one straight away—just to hear that crackle when you break into the crust.
Other Bread Recipes to try
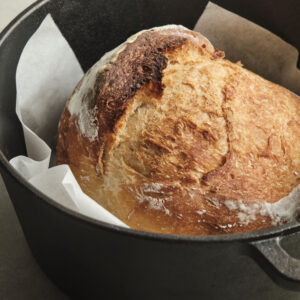
If you enjoyed making this baguette, there are a few other bread recipes on my blog that follow the same hands-on, simple approach. My no-knead Dutch oven bread is a great next step—it’s even more relaxed in method, but still gives you that deep crust and soft, open crumb.
If you want something with a bit more technique and character, try my German pretzel recipe. It’s a different style of dough handling, but just as rewarding once you get into the rhythm. Both are great ways to keep building confidence with bread.

How to make French Baguette
Ingredients
Method
- Combine all ingredients in a bowl until no dry flour remains. Cover and let the dough rest for about 15 minutes.
- Over the next 1½ hours, perform 3 sets of stretch and folds, gently lifting and folding the dough over itself. After each set, flip the dough over, cover, and let it rest.
- Cover the bowl and place it in the fridge for an overnight fermentation of 12–14 hours.
- Turn the dough onto a lightly floured surface. Divide into 3 equal pieces and shape each into a rough rectangle. Cover and let rest for 45–60 minutes so the gluten relaxes.
- Take each piece and gently stretch it into a rectangle. Fold it into a tight cylinder, sealing the seam as you go. Roll lightly with your hands to lengthen each baguette to about 14–15 inches.
- Place the shaped baguettes on a floured couche, seam side up. Cover and proof at room temperature for 30 minutes, until light and slightly puffy.
- Preheat the oven to 500°F (260°C) with a baking stone in the upper half and a pan of hot water on the lower rack for steam.
- Transfer baguettes onto parchment paper, seam side down, and gently dust off excess flour. Score each baguette 3 times with a sharp blade using quick, confident cuts.
- Carefully transfer the baguettes onto the hot baking stone or baking tray, being mindful of steam. Close the oven and reduce the temperature to 475°F (245°C). Bake for 15 minutes.
- Remove the water pan, rotate the baguettes, lower the temperature to 450°F (230°C), and bake for another 15 minutes until deep golden brown and crisp.
Notes
- Don’t rush fermentation
- Handle the dough gently
- Steam is key for the crust